Integrate Chaos Mesh to GitHub Actions
This document describes how to use chaos-mesh-action to integrate Chaos Mesh into the continuous integration (CI) workflow. This helps you identify issues that have been introduced into system development before product releases.
chaos-mesh-action is a GitHub action that has been released on GitHub Marketplace. Its source code is also available on GitHub.
Design of chaos-mesh-action
GitHub Action is the continuous integration (CI) and continuous deployment (CD) feature natively supported by GitHub. Using GitHub Actions, you can easily automate and customize software development workflows directly in your repository.
With GitHub Actions, Chaos Mesh can be easily integrated into your daily development and testing, ensuring that all code submitted on GitHub is bug-free (or at least passes tests) without affecting the existing logic. The image below shows chaos-mesh-action integrated into the CI workflow:
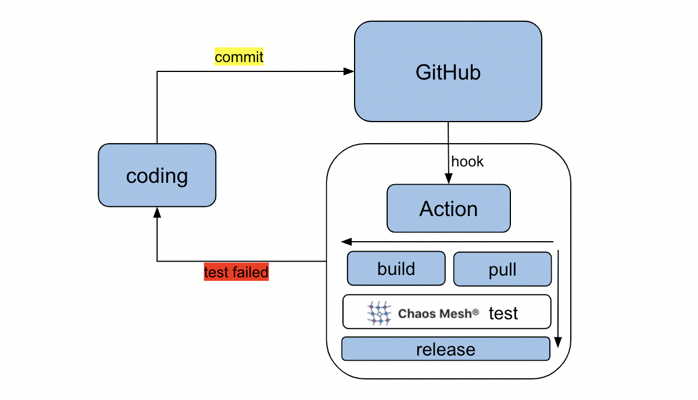
Use chaos-mesh-action in GitHub workflow
chaos-mesh-action works with GitHub workflows. A GitHub workflow is a configurable automated process that you can set up in your repository to build, test, package, publish, or deploy any GitHub project. To integrate Chaos Mesh into your CI, follow the steps below:
- Step 1: Design workflow
- Step 2: Create workflow
- Step 3: Run workflow
Step 1: Design workflow
Before designing a workflow, consider the following questions:
- What features do you want to test in this workflow?
- What type of fault will be injected?
- How to verify the correctness of the system?
For example, we can design a simple workflow for tests. The steps below can be included:
- Create two Pods in the Kubernetes cluster.
- Send a ping request from one Pod to another Pod.
- Use Chaos Mesh to inject the network latency fault to test whether the ping command is affected.
Step 2: Create workflow
After the workflow is designed, take the following steps to create a workflow.
- Enter the GitHub repository of the software to be tested.
- Create a workflow by clicking
Actionsand then clickNew workflow.
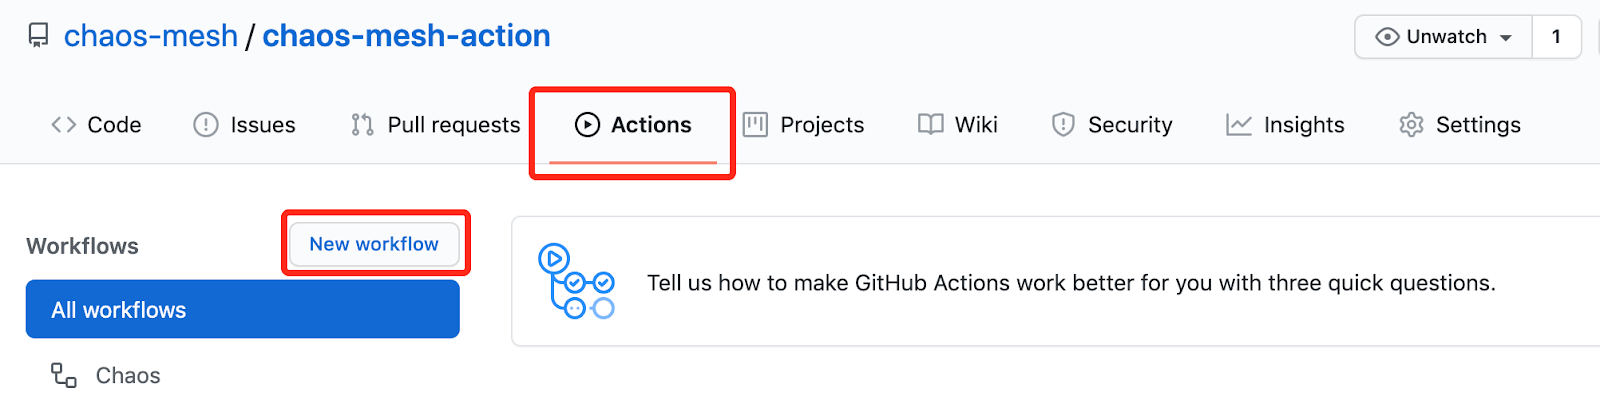
In essence, a workflow is a sequentially automated job configuration. Note that the following job is configured in a single file. For clarity, the script is split into different working groups, as shown below:
-
Set the workflow name and the trigger rules.
Name the workflow "Chaos". When you commit code or create a pull request to the master branch, this workflow is triggered.
name: Chaoson:push:branches:- masterpull_request:branches:- master -
Install the CI-related environment.
This configuration specifies the operating system (Ubuntu) and creates a Kind cluster using helm/kind-action. After that, it prints the cluster information. Finally, it checks out the GitHub repository that the workflow is to access.
jobs:build:runs-on: ubuntu-lateststeps:- name: Creating kind clusteruses: helm/kind-action@v1.0.0-rc.1- name: Print cluster informationrun: |kubectl config viewkubectl cluster-infokubectl get nodeskubectl get pods -n kube-systemhelm versionkubectl version- uses: actions/checkout@v2 -
Deploy an application.
In the following example, this job deploys an application that creates two Kubernetes Pods.
- name: Deploy an applicationrun: |kubectl apply -f https://raw.githubusercontent.com/chaos-mesh/apps/master/ping/busybox-statefulset.yaml -
Inject faults using Chaos Mesh.
- name: Run chaos mesh actionuses: chaos-mesh/chaos-mesh-action@v0.5env:CHAOS_MESH_VERSION: v1.0.0CFG_BASE64: YXBpVmVyc2lvbjogY2hhb3MtbWVzaC5vcmcvdjFhbHBoYTEKa2luZDogTmV0d29ya0NoYW9zCm1ldGFkYXRhOgogIG5hbWU6IG5ldHdvcmstZGVsYXkKICBuYW1lc3BhY2U6IGJ1c3lib3gKc3BlYzoKICBhY3Rpb246IGRlbGF5ICMgdGhlIHNwZWNpZmljIGNoYW9zIGFjdGlvbiB0byBpbmplY3QKICBtb2RlOiBhbGwKICBzZWxlY3RvcjoKICAgIHBvZHM6CiAgICAgIGJ1c3lib3g6CiAgICAgICAgLSBidXN5Ym94LTAKICBkZWxheToKICAgIGxhdGVuY3k6ICIxMG1zIgogIGR1cmF0aW9uOiAiNXMiCiAgc2NoZWR1bGVyOgogICAgY3JvbjogIkBldmVyeSAxMHMiCiAgZGlyZWN0aW9uOiB0bwogIHRhcmdldDoKICAgIHNlbGVjdG9yOgogICAgICBwb2RzOgogICAgICAgIGJ1c3lib3g6CiAgICAgICAgICAtIGJ1c3lib3gtMQogICAgbW9kZTogYWxsCg==With chaos-mesh-action, Chaos Mesh is installed and faults are injected automatically. You only need to prepare the configuration of the chaos experiment and get its value encoded in base64. If you want to inject network latency to the Pod, you can use the following configuration example:
apiVersion: chaos-mesh.org/v1alpha1kind: NetworkChaosmetadata:name: network-delaynamespace: busyboxspec:action: delay # the specific chaos action to injectmode: allselector:pods:busybox:- busybox-0delay:latency: '10ms'duration: '5s'scheduler:cron: '@every 10s'direction: totarget:selector:pods:busybox:- busybox-1mode: allGet the base64-encoded value of the chaos experiment configuration file above using the command below:
base64 chaos.yaml -
Verify the correctness of the system.
In this job, the workflow sends ping requests from one Pod to another Pod and observes the network latency.
- name: Verifyrun: |echo "do some verification"kubectl exec busybox-0 -n busybox -- ping -c 30 busybox-1.busybox.busybox.svc
Step 3: Run workflow
Once a workflow is created, you can trigger it by creating a pull request to the master branch. After the workflow finishes running, the output of the verification job is similar to the following:
do some verification
PING busybox-1.busybox.busybox.svc (10.244.0.6): 56 data bytes
64 bytes from 10.244.0.6: seq=0 ttl=63 time=0.069 ms
64 bytes from 10.244.0.6: seq=1 ttl=63 time=10.136 ms
64 bytes from 10.244.0.6: seq=2 ttl=63 time=10.192 ms
64 bytes from 10.244.0.6: seq=3 ttl=63 time=10.129 ms
64 bytes from 10.244.0.6: seq=4 ttl=63 time=10.120 ms
64 bytes from 10.244.0.6: seq=5 ttl=63 time=0.070 ms
64 bytes from 10.244.0.6: seq=6 ttl=63 time=0.073 ms
64 bytes from 10.244.0.6: seq=7 ttl=63 time=0.111 ms
64 bytes from 10.244.0.6: seq=8 ttl=63 time=0.070 ms
64 bytes from 10.244.0.6: seq=9 ttl=63 time=0.077 ms
……
The output shows a series of delays of about 10 milliseconds, lasting for about 5 seconds. This is consistent with the configuration of the chaos experiment injected using chaos-mesh-action.
What's next
Currently, chaos-mesh-action has been applied in TiDB Operator. By injecting Pod faults into the workflow, you can verify the restart of the Operator instances. This ensures that the TiDB Operator can work properly when a Pod of the TiDB Operator is randomly deleted by the injected fault. For details, see the TiDB Operator Workflow page.
In the future, chaos-mesh-action will be applied in more TiDB tests to ensure the stability of TiDB and its components. You are welcome to use chaos-mesh-action to create your own workflow.
If you find any issue in chaos-mesh-action, or find any information is missing, you are welcome to create a GitHub issue or a pull request (PR) in the Chaos Mesh repository. You can also join our Slack channel #project-chaos-mesh in the CNCF workspace.