Simulate HTTP Faults
This document describes how to simulate HTTP faults by creating HTTPChaos experiments in Chaos Mesh.
HTTPChaos introduction
HTTPChaos is a fault type provided by Chaos Mesh. By creating an HTTPChaos experiment, you can simulate faults during HTTP request and response processing. Currently, HTTPChaos supports the following fault types:
abort: interrupts the connectiondelay: injects latency into the request or responsereplace: replaces part of the content in an HTTP request or response messagepatch: adds additional content to an HTTP request or response message
HTTPChaos supports combinations of different fault types. If you configure multiple HTTP fault types when creating an HTTPChaos experiment, the faults are injected in the following order: abort -> delay -> replace -> patch. When the abort fault causes a short circuit, the connection is interrupted directly.
For the detailed description of HTTPChaos configuration, see Field description below.
Notes
Before injecting the faults supported by HTTPChaos, note the following:
- There is no Control Manager of Chaos Mesh running on the target Pod.
- By default, the fault rules affect both the client and the server in the Pod. If you want to affect only one side, refer to the specify side section.
- HTTPS access should be disabled, because injecting HTTPS connections is not currently supported.
- For HTTPChaos injection to take effect, the client should avoid reusing TCP sockets. HTTPChaos does not affect HTTP requests sent over a TCP connection that was established before fault injection.
- Use non-idempotent requests (such as most POST requests) with caution in production environments. If such requests are used, the target service may not return to normal by simply repeating the requests after fault injection.
Create experiments using Chaos Dashboard
-
Open Chaos Dashboard and click NEW EXPERIMENT to create a new experiment:
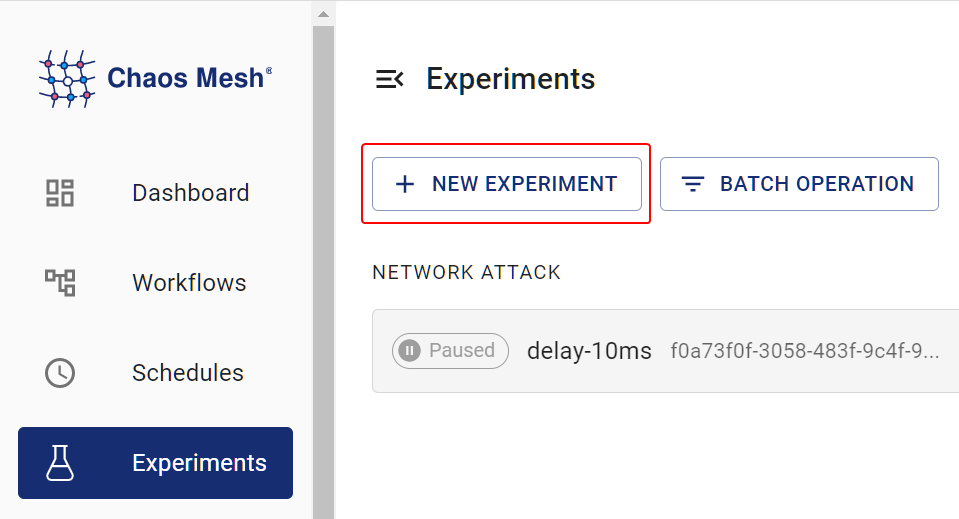
create an experiment -
In the Choose a Target area, choose HTTP FAULT and select a specific behavior, such as
RESPONSE ABORT. Then fill out the specific configurations.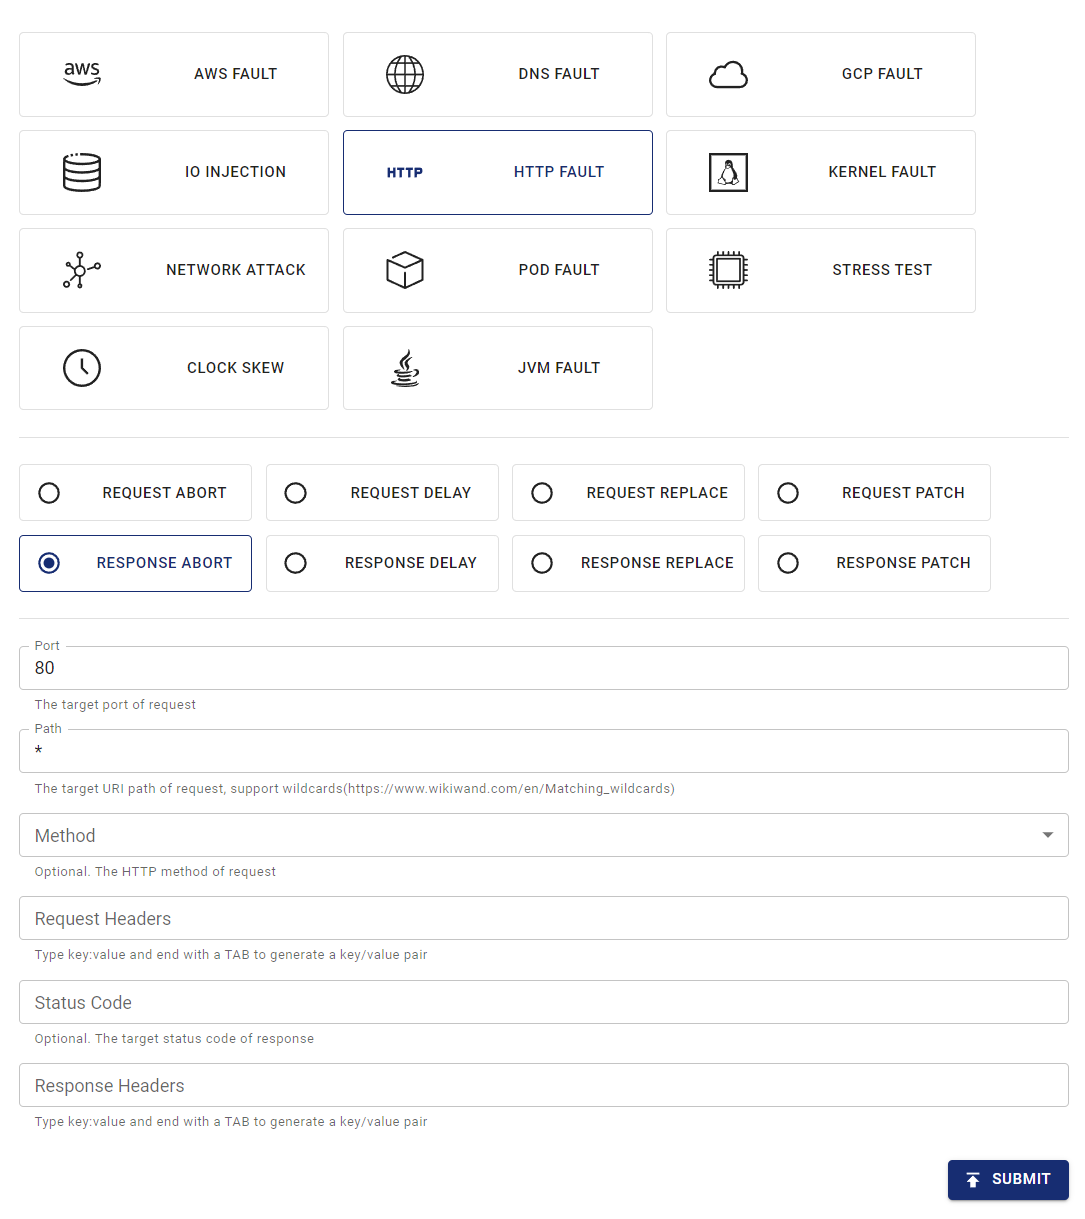
create HTTP fault -
Submit the experiment.
In this example, you have configured the
RESPONSE ABORTfault to be injected into all requests on port 80.
Create experiments using YAML files
Chaos Mesh also supports using YAML configuration files to create HTTPChaos experiments. In a YAML file, you can simulate either one HTTP fault type or a combination of different HTTP fault types.
Example of abort
-
Write the experiment configuration to the
http-abort-failure.yamlfile, as in the following example:apiVersion: chaos-mesh.org/v1alpha1kind: HTTPChaosmetadata:name: test-http-chaosspec:mode: allselector:labelSelectors:app: nginxtarget: Requestport: 80method: GETpath: /apiabort: trueduration: 5mBased on this configuration example, Chaos Mesh injects the
abortfault into the specified Pod for 5 minutes. During fault injection, the GET requests sent through port 80 to the/apipath of the target Pod are interrupted. -
After the configuration file is prepared, use
kubectlto create the experiment:kubectl apply -f ./http-abort-failure.yaml
Example of fault combinations
-
Write the experiment configuration to the
http-failure.yamlfile, as in the following example:apiVersion: chaos-mesh.org/v1alpha1kind: HTTPChaosmetadata:name: test-http-chaosspec:mode: allselector:labelSelectors:app: nginxtarget: Requestport: 80method: GETpath: /api/*delay: 10sreplace:path: /api/v2/method: DELETEpatch:headers:- ['Token', '<one token>']- ['Token', '<another token>']body:type: JSONvalue: '{"foo": "bar"}'duration: 5mBased on this configuration example, Chaos Mesh injects the
delay,replace, andpatchfaults in sequence. -
After the configuration file is prepared, use
kubectlto create the experiment:kubectl apply -f ./http-failure.yaml
Field description
Description for common fields
Common fields are meaningful when the target of fault injection is Request or Response.
| Parameter | Type | Description | Default value | Required | Example |
|---|---|---|---|---|---|
mode | string | Specifies the mode of the experiment. The mode options include one (selecting a random pod), all (selecting all eligible pods), fixed (selecting a specified number of eligible pods), fixed-percent (selecting a specified percentage of Pods from the eligible pods), and random-max-percent (selecting the maximum percentage of Pods from the eligible pods). | yes | one | |
value | string | Provides parameters for the mode configuration depending on the value of mode. | no | 1 | |
target | string | Specifies whether the target of fault injection is Request or Response. The target-related fields should be configured at the same time. | yes | Request | |
port | int32 | The TCP port that the target service listens on. | yes | 80 | |
path | string | The URI path of the target request. Supports wildcard matching. | Takes effect on all paths by default. | no | /api/* |
method | string | The HTTP method of the target request. | Takes effect for all methods by default. | no | GET |
request_headers | map[string]string | Matches the request headers of the target request. | Takes effect for all requests by default. | no | Content-Type: application/json |
abort | bool | Indicates whether to inject the fault that interrupts the connection. | false | no | true |
delay | string | Specifies the time for a delay fault. | 0 | no | 10s |
replace.headers | map[string]string | Specifies the key-value pairs used to replace the request headers or response headers. | no | Content-Type: application/xml | |
replace.body | []byte | Specifies the content used to replace the request body or response body (Base64 encoded). | no | eyJmb28iOiAiYmFyIn0K | |
patch.headers | [][]string | Specifies the key-value pairs appended to the request headers or response headers by the patch fault. | no | - [Set-Cookie, one cookie] | |
patch.body.type | string | Specifies the type of the patch fault applied to the request body or response body. Currently, only JSON is supported. | no | JSON | |
patch.body.value | string | Specifies the content of the patch fault applied to the request body or response body. | no | {"foo": "bar"} | |
duration | string | Specifies the duration of the experiment. | yes | 30s | |
scheduler | string | Specifies the scheduling rules for the time of the experiment. | no | 5 * * * * | |
tls.secretName | string | Specifies the name of the required Secret resource. | no | "http-tls-scr" | |
tls.secretNamespace | string | Specifies the namespace of the required Secret resource. In most cases, it should be the same namespace as the chaos-controller-manager deployment. | no | "chaos-mesh" | |
tls.certName | string | Specifies the name of the certificate file in the Secret, for example tls.crt. | no | "tls.crt" | |
tls.keyName | string | Specifies the name of the key file in the Secret, for example tls.key. | no | "tls.key" | |
tls.caName | string | Specifies the name of the CA file in the Secret, for example ca.crt. | no | "ca.crt" |
-
When creating experiments with YAML files,
replace.bodymust be the base64 encoding of the replacement content. -
When creating experiments with the Kubernetes API, there is no need to encode the replacement content. Just convert it to
[]byteand put it into thehttpchaos.Spec.Replace.Bodyfield. The following is an example:
httpchaos.Spec.Replace.Body = []byte(`{"foo": "bar"}`)
Description for target-related fields
Request-related fields
The Request-related fields are meaningful when target is set to Request.
| Parameter | Type | Description | Default value | Required | Example |
|---|---|---|---|---|---|
replace.path | string | Specifies the URI path used to replace content. | no | /api/v2/ | |
replace.method | string | Specifies the HTTP method used to replace the request method. | no | DELETE | |
replace.queries | map[string]string | Specifies the key-value pairs used to replace the URI query. | no | foo: bar | |
patch.queries | [][]string | Specifies the key-value pairs appended to the URI query by the patch fault. | no | - [foo, bar] |
Response-related fields
The Response-related fields are meaningful when target is set to Response.
| Parameter | Type | Description | Default value | Required | Example |
|---|---|---|---|---|---|
code | int32 | Matches the response status code of the target. | Takes effect for all status codes by default. | no | 200 |
response_headers | map[string]string | Matches the response headers of the target. | Takes effect for all responses by default. | no | Content-Type: application/json |
replace.code | int32 | Specifies the status code used to replace the response status code. | no | 404 |
Specify side
By default, the fault rules affect both the client and the server in the Pod, but you can affect only one side by matching the request headers.
This section provides some examples of specifying the affected side. You can adjust the header selector in the rules depending on your particular cases.
Client side
To inject faults into the client in the Pod without affecting the server, you can match the request or response by the Host header in the request.
For example, if you want to interrupt all requests to http://example.com/, you can apply the following YAML config:
apiVersion: chaos-mesh.org/v1alpha1
kind: HTTPChaos
metadata:
  name: test-http-client
spec:
  mode: all
  selector:
    labelSelectors:
      app: some-http-client
  target: Request
  port: 80
  path: '*'
  request_headers:
    Host: 'example.com'
  abort: true
Server side
To inject faults into the server in the Pod without affecting the client, you can also match the request or response by the Host header in the request.
For example, if you want to interrupt all requests to your server behind the service nginx.nginx.svc, you can apply the following YAML config:
apiVersion: chaos-mesh.org/v1alpha1
kind: HTTPChaos
metadata:
  name: test-http-server
spec:
  mode: all
  selector:
    labelSelectors:
      app: nginx
  target: Request
  port: 80
  path: '*'
  request_headers:
    Host: 'nginx.nginx.svc'
  abort: true
In other cases, especially when injecting faults into inbound requests from outside, you may match the request or response by the X-Forwarded-Host header in the request.
For example, if you want to interrupt all requests to your server behind the public gateway nginx.host.org, you can apply the following YAML config:
apiVersion: chaos-mesh.org/v1alpha1
kind: HTTPChaos
metadata:
  name: test-http-server
spec:
  mode: all
  selector:
    labelSelectors:
      app: nginx
  target: Request
  port: 80
  path: '*'
  request_headers:
    X-Forwarded-Host: 'nginx.host.org'
  abort: true
TLS
To inject faults into TLS connections, enable TLS mode. In TLS mode, the Chaos Mesh proxy acts as both a server and a client, so it needs a trusted CA and the corresponding certificate and key. You need to create the TLS certificate, key, and CA on your own and store them in a Secret, then reference the Secret through the tls fields.
To create a new TLS server and inject faults into its connections, do the following:
-
Create your own root CA private key and root CA certificate:
openssl req -newkey rsa:4096 -x509 -sha512 -days 365 -nodes -out ca.crt -keyout ca.key -
Create the server's Certificate Signing Request:
openssl genrsa -out server.key 2048openssl req -new -key server.key -out server.csr -
Write the extension file
server.extfor the server:authorityKeyIdentifier=keyid,issuerbasicConstraints=CA:FALSEkeyUsage = digitalSignature, nonRepudiation, keyEncipherment, dataEnciphermentsubjectAltName = @alt_names[alt_names]IP.1 = X.X.X.X -
Generate the server certificate:
openssl x509 -req -in server.csr -CA ca.crt -CAkey ca.key -CAcreateserial -out server.crt -days 365 -sha256 -extfile server.ext -
Add the CA
ca.crtto the client. -
Store
server.key,server.crt, andca.crtin a Secret, and reference the Secret through thetlsfields.
To inject faults into a client connection, the Chaos Mesh proxy acts as the remote server. In this case, change the server.ext file above to match the target domain.
For example:
subjectAltName = @alt_names

[alt_names]
DNS.1 = *.domain.com
IP.1 = xxx.xxx.xxx.xxx
Local debugging
If you are not sure of the effects of certain fault injections, you can also test the corresponding features locally using rs-tproxy. Chaos Mesh uses rs-tproxy to implement HTTPChaos.